
“I cannot believe we still get the same view with these screens installed. They blend in seamlessly and work perfectly.”
Lisa Elliot

Find your door or window below. See how to photograph it and which part to measure, together in one place. A clear photo and rough sizes help us prepare an indicative estimate.
Start with a useful photo
Use your phone’s normal camera setting in good daylight. Show the frame depth at an angle, without hiding the far side. Add a close-up only where a handle, track or obstruction is hard to see.
Your opening. Your photos. Your rough sizes.
Choose an opening below. Its photo tips and measuring instructions are together, so you can finish one opening before moving to the next.
Photos show the context. Include the whole frame and fixed panels.
Sizes show the opening. Height, then width in millimetres. Exclude fixed glass.
Rough is fine. We confirm final dimensions at the measure-up.
Not sure which type? Send a whole-opening photo and tell us how it opens. For louvres, tilt-and-turn, sash or unusual openings, we’ll advise what else we need.
Only open or measure what you can reach safely. You can still enquire without photos or sizes.
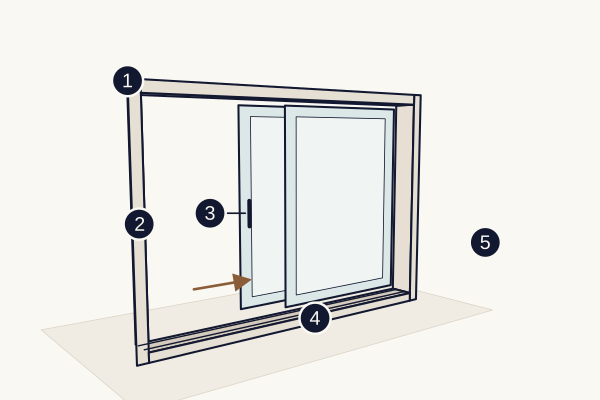
Opening 01 / One sliding panel + one fixed panel
First, open it up. Slide the moving door fully across the fixed panel if practical. Keep both panels and the whole frame in the photo.
Usually outside, looking in.
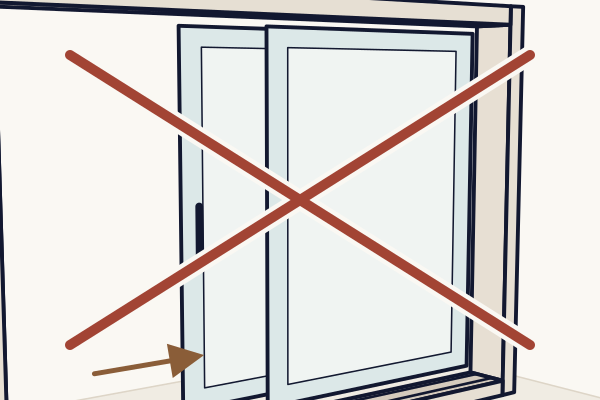
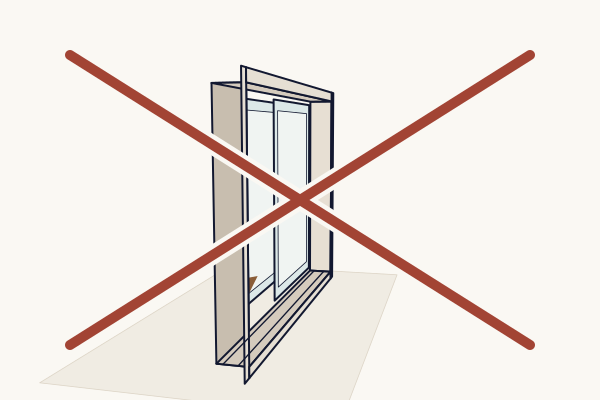
Stand at a clear angle, far enough back to show the open gap, fixed panel, handle and bottom track. In the usual arrangement, the sliding panel runs on the house side of the fixed panel.
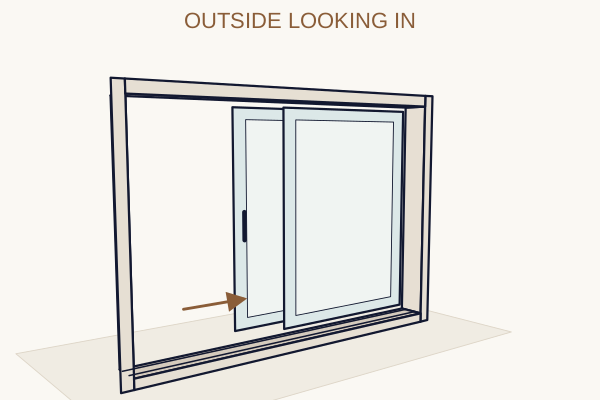
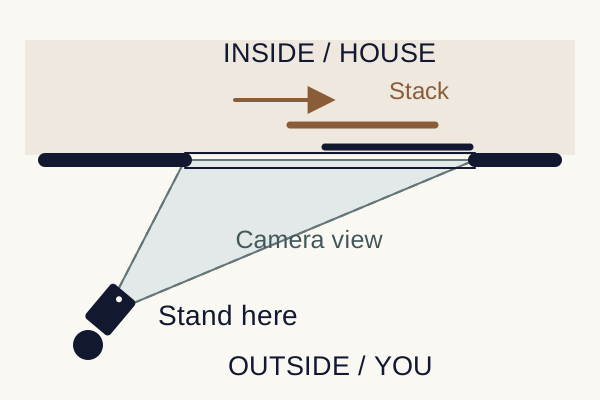
The cone shows your camera view. The solid arrow shows how the door or window opens. Photo position does not decide where the screen will be mounted.
Measure the gap left by the open door.
With the door open, record the opening height and the width of the clear gap. The fixed panel stays out of the measurement. Do not measure across the full two-panel unit.
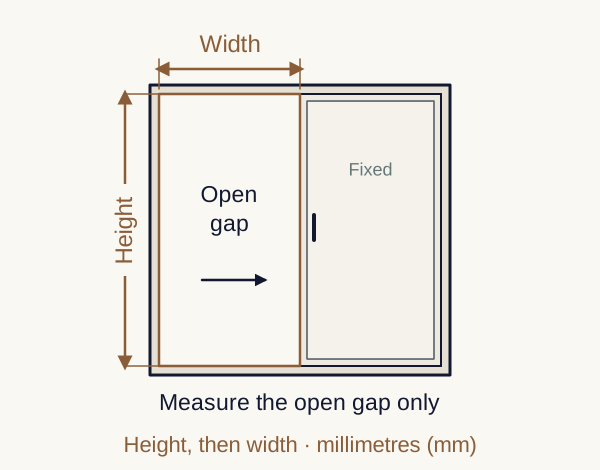
Worth showing: Include the track, handle and any step. A left-sliding door follows the same rule. More moving panels? Use the stacking-door section below.
Opening 02 / Front doors & back doors
First, open it up. Open the door enough to show the opening, the handle and the direction it swings.
For an inward-opening door, stand outside.
Take an angled view of the whole frame, threshold and surrounding space, with the door opening away from you. Include the handle, hinges, step and any existing security door.
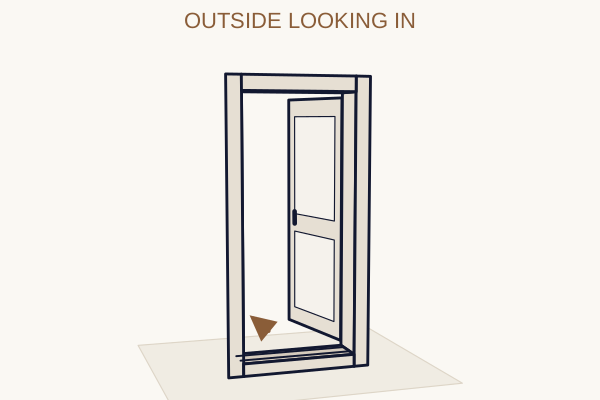
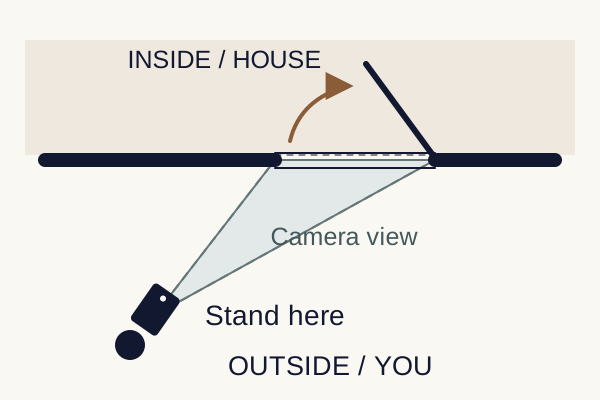
The cone shows your camera view. The solid arrow shows how the door or window opens. Photo position does not decide where the screen will be mounted.
Measure the single door opening.
Record the height from the threshold to the top of the opening, then the width between the sides. Exclude any fixed glass beside or above the door.
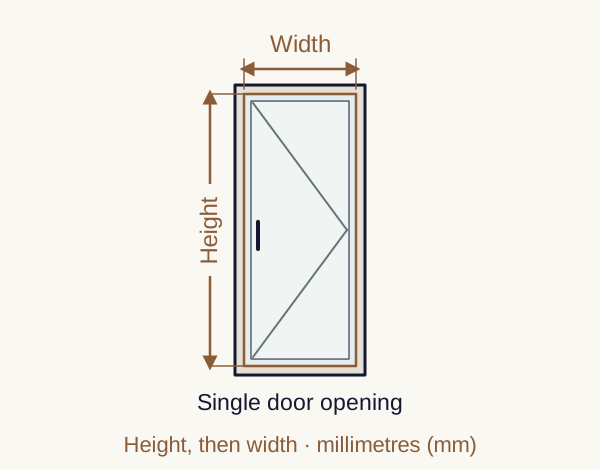
Worth showing: Show any door closer, projecting handle, security door or nearby wall that could affect screen clearance.
Opening 03 / Multiple sliding panels or centre-opening
First, open it up. Slide the moving panels fully open if practical. Keep the fixed panels in the overview so we can understand the whole unit.
Usually outside, looking in.
Stand at a clear angle, far enough back to include the full frame, open gap, handles and bottom track. The usual arrangement has the panels stacking on the house side.
The cone shows your camera view. The solid arrow shows how the door or window opens. Photo position does not decide where the screen will be mounted.
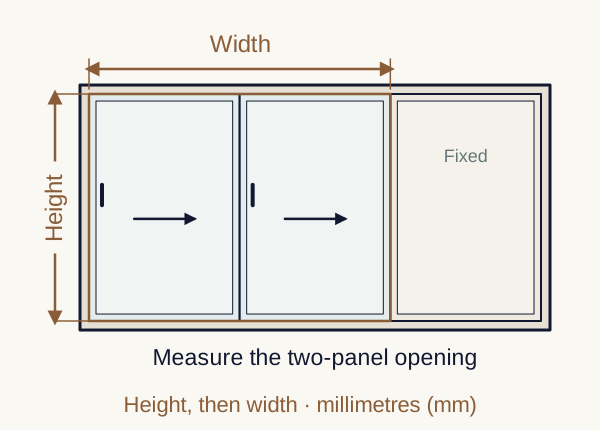
Measure the open gap, not the whole glazed unit.
With the panels open, measure the height from the bottom to the top of the opening and the width of the gap you want screened. Leave the fixed panel or panels out of both measurements.
Open both sides. Measure the central gap as one opening when there is no fixed centre post. Exclude the fixed panels at either end.
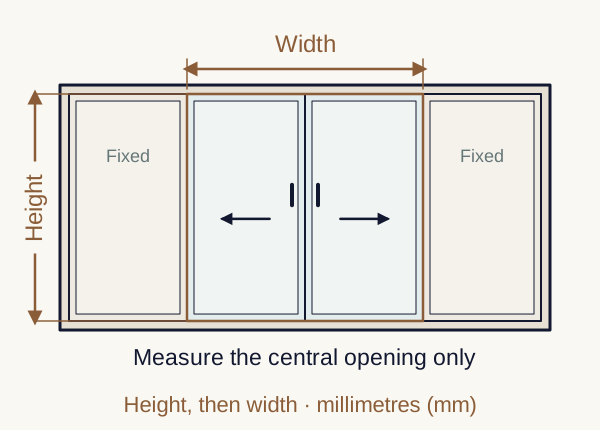
Worth showing: Show the centre meeting point, both panel stacks and any fixed post. If a fixed post divides the space, label and measure the openings separately.
Opening 04 / Linked panels fold together
First, open it up. Fold the panels back if practical. Show the folded stack as well as the full frame and tracks.
Usually inside, looking out.
For doors that fold outwards, stand inside at an angle so the folded panels are on the far side of the opening. Keep the head, threshold and both sides in view.
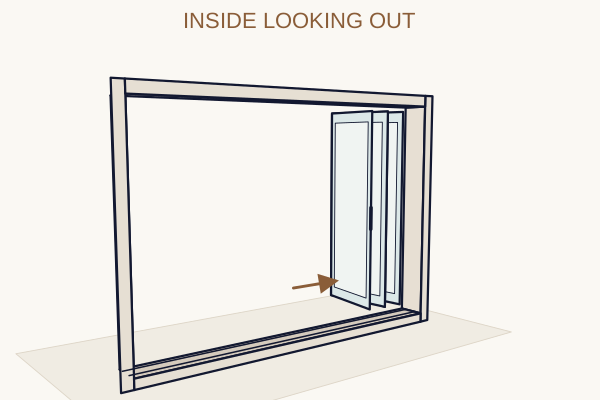
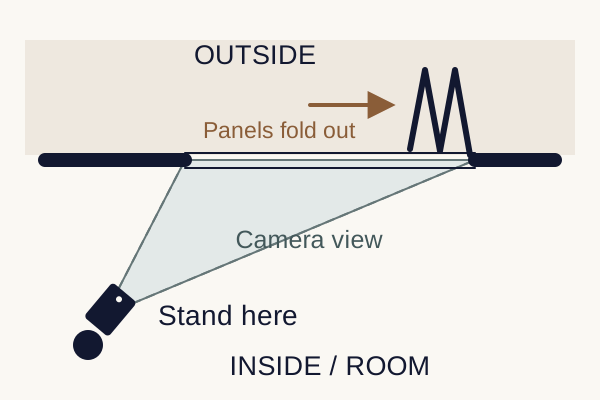
The cone shows your camera view. The solid arrow shows how the door or window opens. Photo position does not decide where the screen will be mounted.
Measure the opening between the frame boundaries.
Record the height and width of the opening you want screened, excluding any adjoining fixed glass. Include the folded stack in your photo so we can check whether it projects into that space.
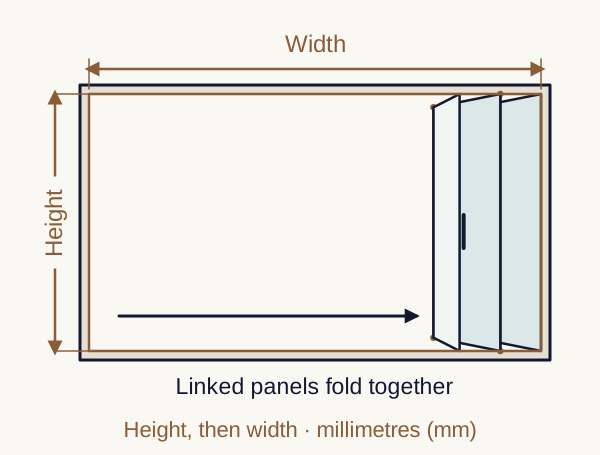
Worth showing: Show any traffic door, centre post, projecting stack or step. We confirm the screen position and final dimensions at measure-up.
Opening 05 / Two doors hinged at the outer sides
First, open it up. Open both doors enough to show the shared opening and the direction they swing.
Stand on the side the doors open away from.
For outward-opening doors, photograph from inside. For inward-opening doors, photograph from outside. Include hinges, handles, the full frame and the threshold.
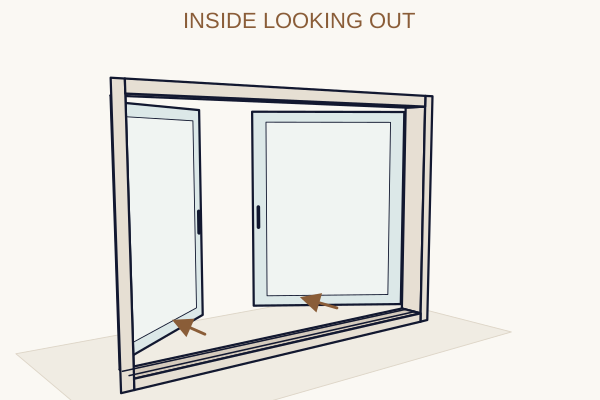
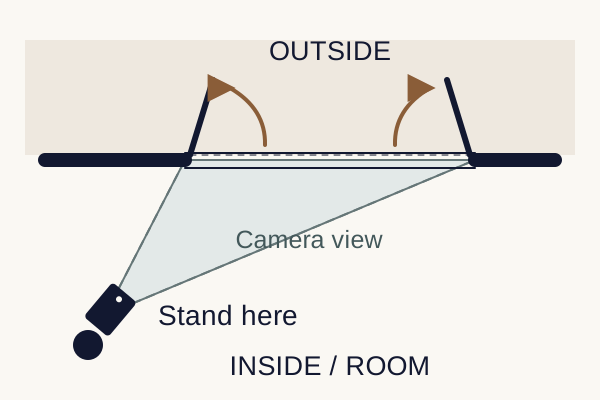
The cone shows your camera view. The solid arrow shows how the door or window opens. Photo position does not decide where the screen will be mounted.
Measure the opening you want screened.
For a pair screened as one opening, record the height and the width across both doors together. Exclude fixed sidelights and any fixed glass above.
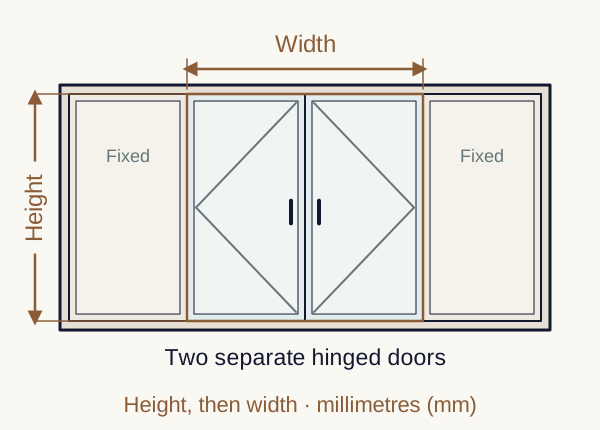
Worth showing: If there is a fixed centre post, show it clearly and measure each opening separately. Tell us if you only want one side screened.
Opening 06 / Hinged at the top or side
First, open it up. Open the sash if it is easy to reach. An awning is hinged at the top; a casement is hinged at the side.
Usually inside, looking out.
Take an angled view of the whole window and surrounding frame. Include the sill, winder or handle, window stays and nearby blinds, curtains or shutters.
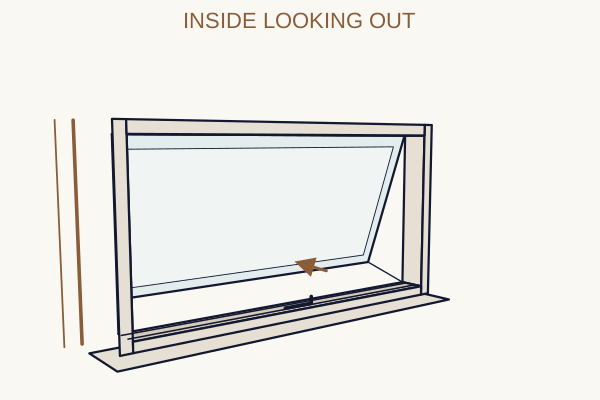
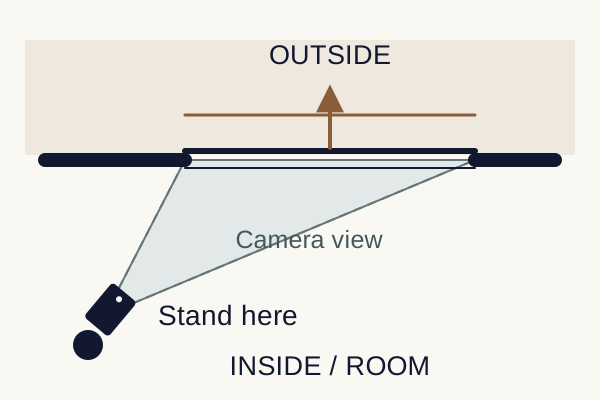
The cone shows your camera view. The solid arrow shows how the door or window opens. Photo position does not decide where the screen will be mounted.
Measure each opening section separately.
Record the height and width of the opening to be screened. Exclude fixed glass below or beside it. If fixed glass or a fixed frame member separates two openings, label and measure each one.
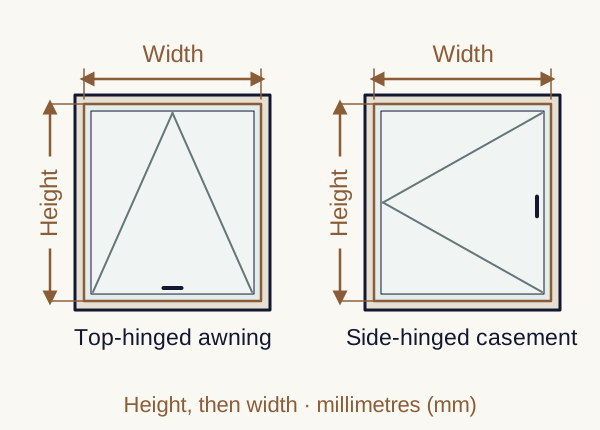
Keep fixed glass in the overview photo, but leave it out of your rough sizes. These awning examples show the same opening-only rule for different frame layouts.
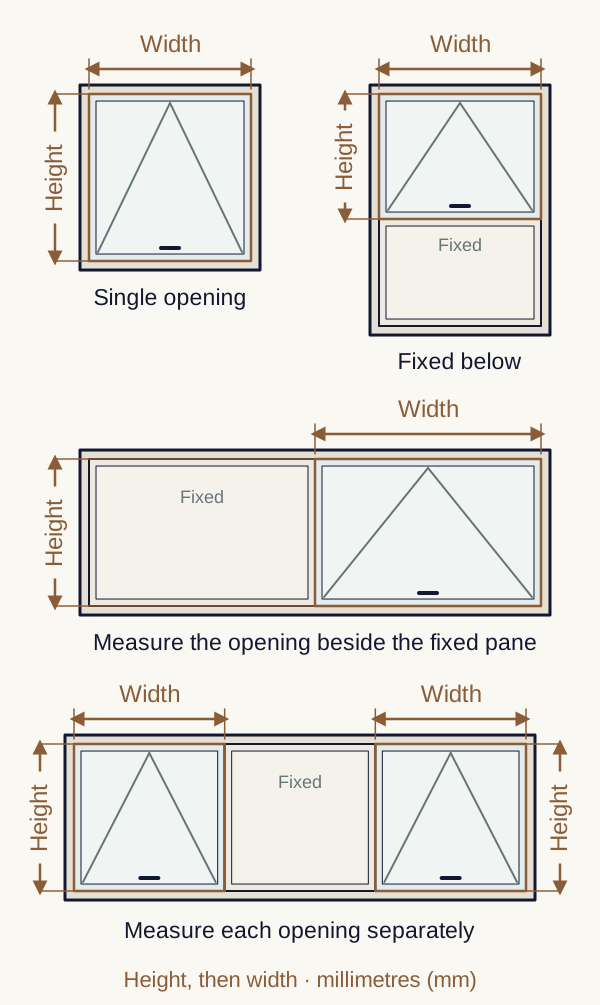
Worth showing: A photo showing the depth behind blinds or shutters helps us assess clearance. Do not guess a mounting allowance or add extra width.
Opening 07 / Window panels slide sideways
First, open it up. Slide the moving panel or panels back if practical. Keep the whole window in your overview, including the fixed glass.
Start inside, with the window open.
Take an angled photo showing the open gap, tracks, handles, sill and surrounding frame. Include any blinds, shutters or a door that slides past the window.
Sliding panels may run inside or outside. Show which side the panels run on; add a view from the other side only if it is easy and safe.
Measure the open gap, excluding fixed glass.
Record the height and width of the gap you want screened with the window open. For centre-opening or stacking windows, show the complete arrangement and where the panels finish.
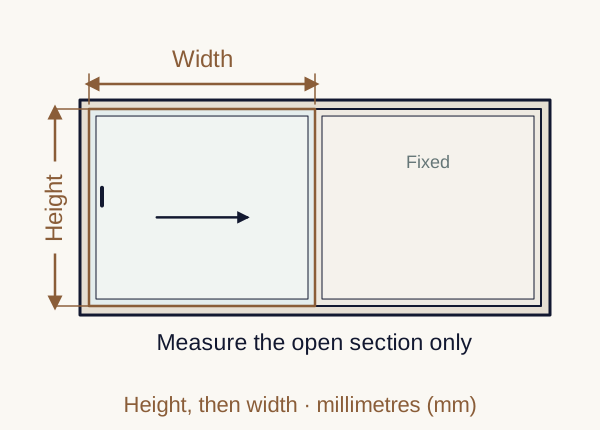
Worth showing: If a fixed post separates the openings, record each one separately. If you are unsure which part to measure, send the photo first.
Opening 08 / Folding windows & serveries
First, open it up. Fold the panels back if practical, and photograph the opening from the side opposite the folded stack.
Usually inside for outward-folding windows.
Use an angled view showing the full frame, folded panels, top and bottom tracks and any benchtop. Include handles, nearby taps, blinds or other obstructions.
For inward-folding windows, use an outside view if accessible. Show whether the panels fold to one side or split to both sides.
Measure the window opening, not the benchtop.
Record height from the sill or bottom opening boundary to the top, then width between the side boundaries. Exclude adjoining fixed glass; show any permanent posts and measure separated openings individually.
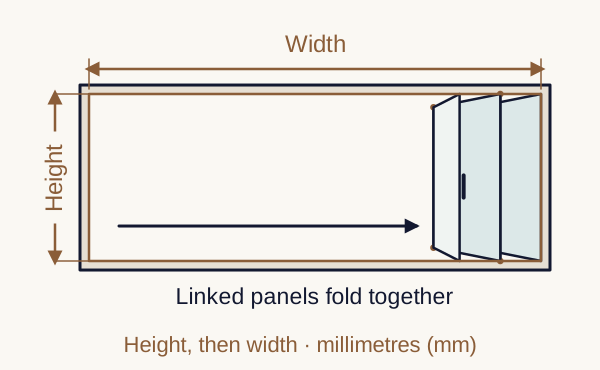
Worth showing: If there is no obvious bottom frame, photograph the junction with the bench. We will confirm the screen position before final measurement.
FAQ
No. Approximate height and width, clearly labelled in millimetres, help us prepare an indicative price. You can still enquire without photos or sizes. We confirm final measurements at the measure-up before manufacture.
Send a photo and any rough sizes you have. We check for out-of-square openings at the measure-up and confirm a suitable solution.
Start with one clear overview of each opening, then add a detail photo if something is hard to see. The enquiry form accepts up to six photos or plans in total. If you have more openings, tell us about them in your enquiry.
In the words of Kiwi homeowners
“I cannot believe we still get the same view with these screens installed. They blend in seamlessly and work perfectly.”
Lisa Elliot
“We should have done this years ago. Fresh air through the house without worrying about flies or mosquitoes. No more fly spray.”
Steve & Carol
“The service was outstanding. Everything from measure to install was smooth, and the quality is fantastic. Highly recommend.”
Dawn McNaughton
Enquire
Start with an overview photo, any rough sizes you have and your installation address. We recommend a screen and give an indicative price, then arrange a precise measure-up and professional fitting.
Photos and sizes are optional. We can help you get started.
For doors and windows, see our photo and rough-measurement guide.
Worked out from your photos and rough sizes - no visit needed.
We confirm details on site once you're happy with the solution and product.
Custom-made and professionally fitted, with aftercare arranged through Phantom Screens NZ.